Minecraft声音系统和OpenAL详解
背景
原版的声音系统基于Paul的SoundSystem,作者和官网信息如下:
Author: Paul Lamb
http://www.paulscode.com
简介
minecraft的声音系统基于这个第三方的声音系统,包装了OpenAL,实现了一些常用的功能,同时使用了一个指令线程来实现类似消息队列的功能,并同时保证了OpenAL上下文和具体代码在同一线程执行。
为了说清楚原版声音系统的一些问题,我们首先要对这个声音系统进行完全地了解。
Paul’s Sound System
由于minecraft一直在迭代,所以为了具体说明,我这里只拿出1.12.2版本的声音系统库,Paul的声音系统经过抽象化,可以对不同的音频api进行兼容,在minecraft中,可以以类似插件的形式加载jdk自带的 JavaSound ,或是 lwjgl下的 OpenAL,这两个库都以其自定义的Library 的形式加载进它的sound system。
为了说明方便,在接下来的描述中,所有对Paul’s Sound System的描述使用单词首字母缩写PSS。
初始化
不同的音频api在SoundSystem的构造函数初始化:
LinkedList<Class> libraries = SoundSystemConfig.getLibraries();

if( libraries != null )
{
    ListIterator<Class> i = libraries.listIterator();
    Class c;
    while( i.hasNext() ){
        c = i.next();
        try{
        	init( c );
        	return;
        }catch( SoundSystemException sse ){
         	logger.printExceptionMessage( sse, 1 );
        }
    }
    try{
      init( Library.class );
      return;
    }catch(...){

    }
}
在Config中加载第一个可以成功加载的类库。
一般情况下,在游戏中,我们会加载OpenAL作为音频API,以下所有内容都会默认为通过OpenAL处理资源。
首先我们关注PSS中的SoundBuffer(省略部分代码):
public class SoundBuffer
{
/**
 * The actual audio data.
 */
    public byte[] audioData;
/**
 * The audio format in which the data is stored.
 */
    public AudioFormat audioFormat;

    ...

}
SoundBuffer是PSS中为了嫁接所有音频api(或解码库)中的声音单元的数据类型,将声音数据表示为byte数组和其格式描述符。
其次作为所有插件的抽象类,PSS设计了Library类来承载不同的音频api:
public class Library
{
    protected ListenerData listener;

    protected HashMap<String, SoundBuffer> bufferMap = null;

    protected HashMap<String, Source> sourceMap;  // (name, source data) pairs

    private MidiChannel midiChannel;

    protected List<Channel> streamingChannels;

    protected List<Channel> normalChannels;

    private String[] streamingChannelSourceNames;

    private String[] normalChannelSourceNames;

    private int nextStreamingChannel = 0;

    private int nextNormalChannel = 0;

    protected StreamThread streamThread;

    protected boolean reverseByteOrder = false;
}
SoundSystem 要做的事情可以简化为:
- 读取数据到内存,并安排正确的描述符以保证正确的播放;
- 对以读取的数据在合适的时间合适的空间位置播放(因为他是一个3D音频播放系统)。
对于读取数据到内存,具体来说可以包括音频的解码,和数据结构的重组织。
对于播放,具体包括以怎样的音调,声音响度,在不同的通道上播放声音;以怎样的空间时序播放一系列声音资源;以怎样的逻辑安排声音的播放暂停和停止。
最后,作为一个音频数据处理接口,当然也要合理的管理和销毁内存中的音频资源。
所以,如果按照以上思路,PSS的整个架构就十分清楚了。
PSS对外开放的几个接口或者抽象类分别是Library,Channel,Source。其中Library作为一个插件类负责正确地加载外部类库,并暴露给用户(开发者)直接使用的接口,Channel类作为播放类管理资源类Source的具体操作(播放,暂停,停止,入队,出队等)。Source类读取文件和网络流中的数据(包括解码)并保存各种播放模式下需要的数据结构,比如对于流式资源和非流式资源,建立了播放队列来方便管理和播放,同时进行了部分状态的切换,比如对于流式数据对当前流中的资源进行播放暂停停止的切换。SoundSystemConfig负责PSS的加载方式加载内容,包括但不限于加载插件,加载的音频解码器,音频的一些空间传播模式等。
在上述Libray类中可以看到整体的结构:
/**
 * 空间中听众的信息,包括位置和方向
 * 在OpenAL中直接传递给OpenAL处理空间关系,在JavaSound中根据不同的衰减函数计算音量
 */
    protected ListenerData listener;

/**
 * 音频数据和标识符的映射表
 * SoundBuffer为音频片段的直接包装
 */
    protected HashMap<String, SoundBuffer> bufferMap = null;

/**
 * 音频资源和标识符的映射表
 * 每个Source中可能包含更多的Source来处理流式播放
 */
    protected HashMap<String, Source> sourceMap;  // (name, source data) pairs

/**
 * 进行流式播放的通道列表
 */
    protected List<Channel> streamingChannels;

/**
 * 进行非流式播放的通道列表
 */
    protected List<Channel> normalChannels;
对于minecraft中的SoundManager(省略部分代码):
public SoundManager(SoundHandler p_i45119_1_, GameSettings p_i45119_2_)
{
    ...

    try
    {
        SoundSystemConfig.addLibrary(LibraryLWJGLOpenAL.class);
        SoundSystemConfig.setCodec("ogg", CodecJOrbis.class);
        net.minecraftforge.common.MinecraftForge.EVENT_BUS.post(new net.minecraftforge.client.event.sound.SoundSetupEvent(this));
    }
    catch (SoundSystemException soundsystemexception)
    {
        LOGGER.error(LOG_MARKER, "Error linking with the LibraryJavaSound plug-in", (Throwable)soundsystemexception);
    }

    ...
}
可以看到在一开始直接加载了LWJGLOpenAL和ogg的编解码器,这里forge通过事件总线留下了一个“接口”,可以通过这个事件来增加新的解码器和库,对于解码器,可以前往文章开头处的官网查询支持的插件,自行载入。
这里提供官网本身以及第三方(third part)支持的插件列表:
| 插件名 | 原文介绍 | 简介 |
|---|---|---|
| JavaSound library plug-in Version date: January 7, 2012 | Interface to the Java Sound API. More compatible than OpenAL, but not as high quality and fewer features. This plug-in utilizes JavaSound’s panning and volume control methods to simulate an reasonable-quality 3D sound system. Known bug: quickPlaying sounds will begin playing them at full volume for a split second, before switching to the correct volume. This is a bug with the Java Sound API itself, and therefore beyond my control to correct. An easy workaround is to add 0.02 seconds of silence to the beginning of each sound effect (the free Audacity sound editor works well for this). | JavaSound接口,相比于OpenAL兼容性更好,但音频质量不如OpenAL。 |
| LWJGL OpenAL library plug-in Version date: April 17, 2013 | Interface to the LWJGL binding of OpenAL. The LWJGL library (http://www.lwjgl.org) is required for this plug-in to work. This library sounds much better than Java Sound, but is not as compatible. I recommend using the JavaSound library plug-in as a backup option. NOTE: Please read the included LWJGL license. | OpenAL接口,需要LWJGL。 |
| JOAL library plug-in Version date: April 17, 2013 | Interface to the JOAL binding of OpenAL. The JOAL library (http://jogamp.org) is required for this plug-in to work. As mentioned previously, this library sounds much better than Java Sound, but is not as compatible. I recommend using the JavaSound library plug-in as a backup option. NOTE: Please read the included JOAL license. | OpenAL接口,需要安装JOAL。 |
| WAV codec plug-in Version date: October 23, 2010 | Adds support for .wav files. | 解码器。对.wav格式文件的支持。 |
| JOgg codec plug-in Version date: August 24, 2010 | Adds support for .ogg files using the J-Ogg library. This codec is less compatible than the JOrbis codec, but the license is less restrictive. Sometimes running incompatable .ogg files through a converter will make them compatable. NOTE: Please read the included JOgg license. | 解码器。对.ogg格式的支持。 |
| JOrbis codec plug-in Version date: November 23, 2010 | Adds support for .ogg files using the JOrbis library. More compatible than the JOgg codec, but reads data more slowly (it may not be possible to stream more than one file simultaneously when using this codec). This plug-in is licensed by the LGPL. NOTE: Please read the included LGPL document. | 解码器。对.ogg格式的支持,兼容性更高,但是读取速度较慢。 |
| IBXM codec plug-in Version date: August 24, 2010 | Adds support for Protracker, Fast Tracker 2, and Scream Tracker 3 (.s2m, .mod, and .xm) files using the IBXM library. File sizes for these formats tend to be quite small, so this may be a good option for background music. This plug-in is based on or using the IBXM library, which is bound by the BSD License. NOTE: Please read the included license document. | 解码器。对.s2m,.mod,.xm格式的支持。 |
| JSpeex codec plug-in Version date: August 24, 2010 | Adds support for .ogg or .wav files encoded with Speex (a compression optimized for human voice). See http://www.speex.org/ for more information. | - |
| CodecJLayerMP3 [thirdpart] Version data:Aug 16, 2015 | A mp3 codec library for Paulcode’s 3D Sound System. It based on parts of JLayer (mpeg decoder library), MP3SPI and Tritonus library. | 解码器。对.mp3格式的支持。 |
| NotEnoughCodecs [thirdpart] Version data:unknown | Bunch of codecs with adapters for SoundSytem | 这个是OpenMods团队的一个mod,安装了这个mod后,可以解码Flac(无损),和MP3音乐。如果作为开发者,可以参考其中的编解码代码。需要额外引入其他库。 |
回到PSS,在Source中主要式对音频状态的切换,并通过Channel进行音频的直接控制。这类操作主要包括:
void queueSound()//将声音资源加入队列
void dequeueSound()//移除末尾的声音资源
int feedRawAudioData()//喂入裸数据流并播放
void stream()/void preLoad()//从队列中预加载数据到音频api的缓存队列中
...
基于LWJGLOpenAL的音频接口
基本介绍完整个PSS声音系统的结构,我们来看看OpenAL的使用,主要会从PSS的ChannelLWJGLOpenAL来了解OpenAL如何使用。同时,会处理一些这个PSS中未能直接解决的问题,最后将以一个视频播放器的音频部分进行具体的讲解。
OpenAL
简介
OpenAL(Open Audio Library)是自由软件界的跨平台音效API。它设计给多通道三维位置音效的特效表现。其API风格模仿自OpenGL[1]。
OpenAL结构
OpenAL的API风格模仿自OpenGL,所以使用OpenGL顺手的话对OpenAL也很容易掌握。
在OpenAL中最重要的两个对象是设备Device和上下文Context;
以PSS中的ChannelLWJGLOpenAL为例(省略部分代码):
@Override
public void init() throws SoundSystemException
{

    try
    {
        // 这里进行了动态链接库的连接并创建了OpenAL的上下文和设备连接
        AL.create();
        errors = checkALError();
    }
    catch( LWJGLException e )
    {
        ...
    }

	...

}


//-----------------------这段代码来自于AL中,在create()中调用----------------------------

private static void init(String deviceArguments, int contextFrequency, int contextRefresh, boolean contextSynchronized, boolean openDevice) throws LWJGLException {
		try {
			AL10.initNativeStubs();
			ALC10.initNativeStubs();

			if(openDevice) {

                //打开可用的音频设备
				device = ALC10.alcOpenDevice(deviceArguments);
				if (device == null) {
					throw new LWJGLException("Could not open ALC device");
				}


                //创建上下文
				if (contextFrequency == -1) {
					context = ALC10.alcCreateContext(device, null);
				} else {
					context = ALC10.alcCreateContext(device,
							ALCcontext.createAttributeList(contextFrequency, contextRefresh,
								contextSynchronized ? ALC10.ALC_TRUE : ALC10.ALC_FALSE));
				}
				ALC10.alcMakeContextCurrent(context);
			}
		} catch (LWJGLException e) {
			destroy();
			throw e;
		}

		ALC11.initialize();

		if (ALC10.alcIsExtensionPresent(device, EFX10.ALC_EXT_EFX_NAME)){
		    EFX10.initNativeStubs();
		}
	}
相比较于OpenGL,OpenAL对于线程是不敏感的,你可以在任意线程调用它的播放函数,而不会像OpenGL一样要求所有绘制在同一个线程中。
所以如果要在minecraft中使用OpenAL也是极其方便的,你可以在任意线程中调用OpenAL的函数不需要考虑上下文的线程问题。
一旦设备和上下文建立完毕,那么就可以直接开始使用OpenGL;
在OpenAL中,对于一个空间,设定了两个对象来模拟真实世界,分别是听者和播放源,通过声音衰减函数,高低频音频过滤器,多普勒效应模拟来对3D世界的音频传输进行模拟,在其3.0b及之后版本,增加了头相关传输函数(HRTF)拓展来增强沉浸式体验。
多普勒效应公式:
其中F’表示多普勒效应频率,V表示听众速度,VS表示声源速度,F表示实例速度,DV多普勒速度,
DV表示多普勒因子。
当然,我们能主动修改的主要式是声音衰减函数和距离函数[2]。
我们来看看这部分的距离函数:
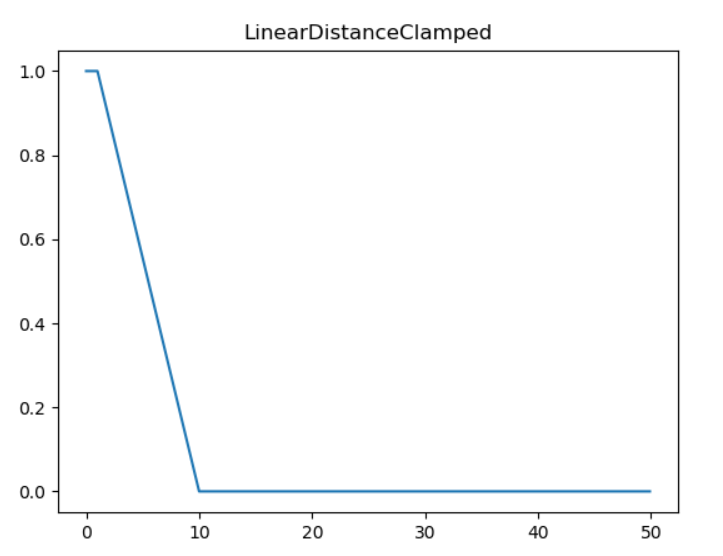
Clamped模式:
线性模型在物理上不是现实的,但确实允许源完全衰减超过指定距离。OpenAL实现仍然可以根据需要自由应用任何范围限制。
如果根据距离公式无法计算出有效的距离,比如使用Clamped模式时当referenceDistance和maxDistance相等时,则增益方程将具有除以零的误差。在这种情况下,该源没有衰减。
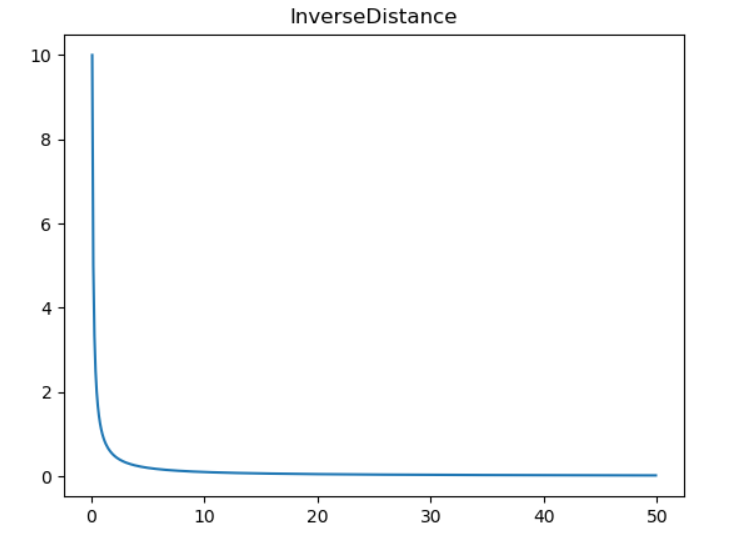
在OpenAL中共有6种声音衰减模式:
NoAttenuation:这种模式不会对声音增益做任何处理。
InverseDistance:相当于IASIG I3DL2模型,但不使用clamped模式的距离,公式:
这里使用的referenceDistance参数是一个每个源的属性,它是侦听器将获得的距离(除非实现必须将有效增益限制到可用的动态范围)。rolloffFactor是每个源的参数,应用程序可以分别通过减小或增大衰减来使用它来增大或减小源的范围。默认值为1。该实现可自由优化rolloffFactor值0,这表明应用程序不希望各个源上的距离衰减。
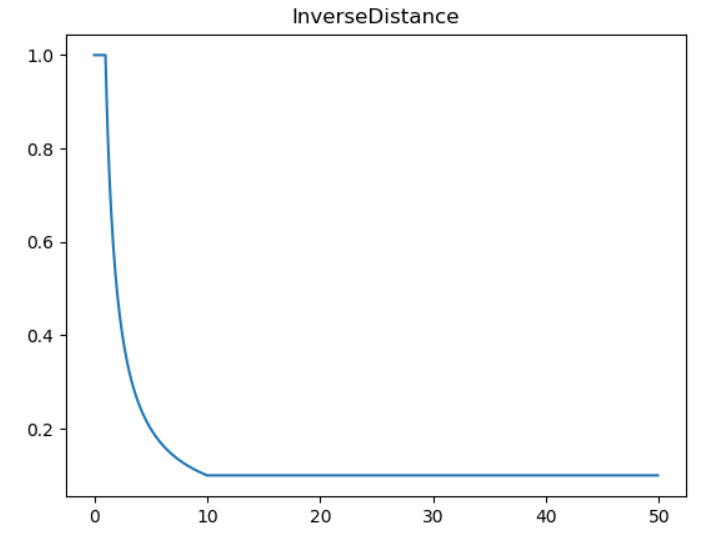
InverseDistanceClamped:clamped模式下的IASIG I3DL2模型。
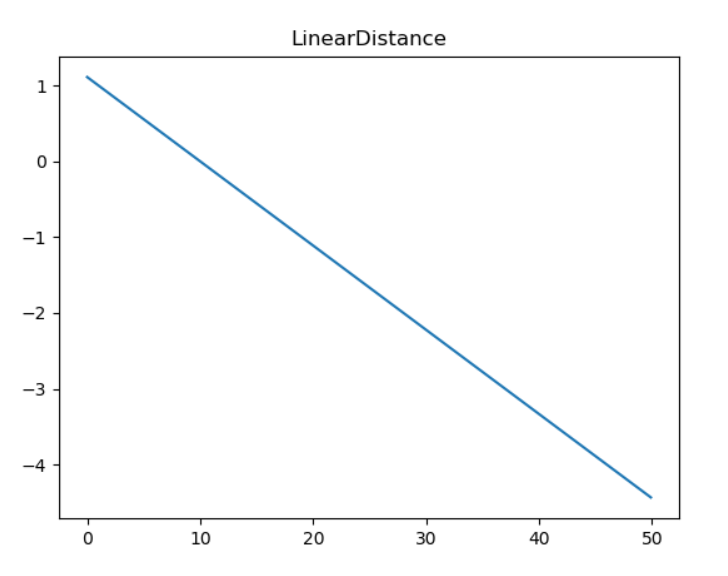
LinearDistance: 线性模式,公式:
LinearDistanceClamped:增加了Clamped的线性模式。
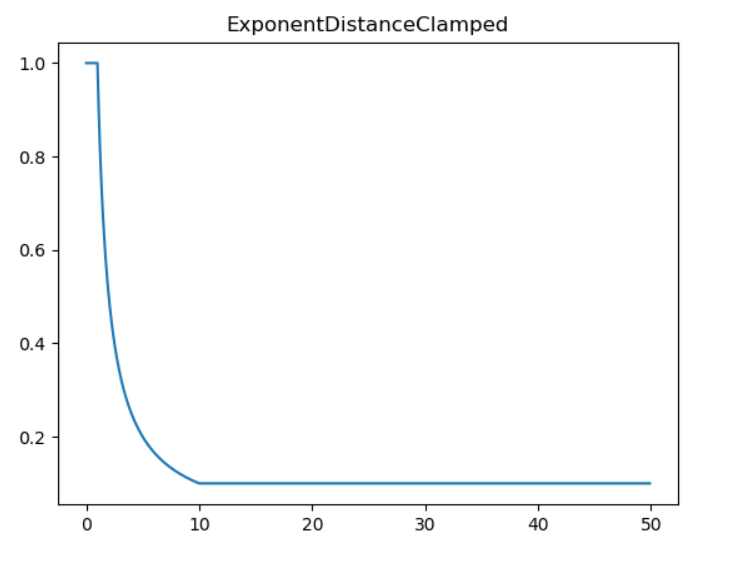
ExponentDistance:指数距离衰减模型,用于模拟源和侦听器之间距离增加时增益的指数下降。公式:

ExponentDistanceClamped:指数距离模型的Clamped模式。
除了物理模型外,在计算机种我们需要将声音片段存储为一个数据格式来进行存储,以供当我们需要时对它进行读取,这里OpenAL为我们提供了装用Buffer来存储,到目前为止,我们完整的集齐了OpenAL中最常用的几大元素:
- 缓冲区(Buffer)
- 声源(Source)
- 听者(Listener)
说明白了OpenAL怎么处理数据仿真真实的世界,我们看看怎么在具体的代码层面将这3者有机的连接起来并构建我们需要的程序。
首先需要说明的是,在OpenAL中支持的声源不仅包括全向声源也包括有向声源,对于有向声源:
有3个重要的属性:AL_CONE_INNER_ANGLE(音锥内角),AL_CONE_OUTER_ANGLE(音锥外角),AL_CONE_OUTER_GAIN(音锥外部增益)。
首先如果要实现有向声源,我们要将AL_DIRECTION属性的向量设置成非零向量,如果该值未修改,那么默认为(0,0,0)也即全向音源。
当我们设置了合理的声源朝向后我们来看看音锥的内外角度和外部增益:
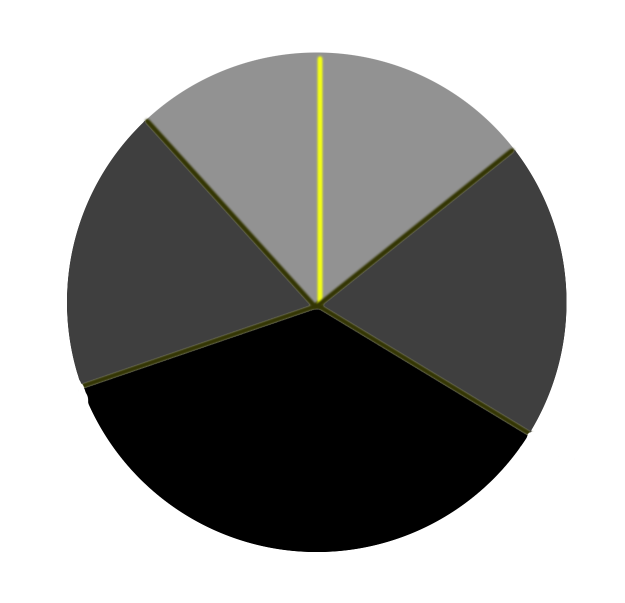
如上图,我们首先声明,其中黄色线条代表声源朝向,该图可以认为是3维空间从上到下的俯视图,其中浅灰色区域为内角范围,深灰色区域为过度区,黑色区域为外角和内角差值背离区。
这样子描述可能不太清楚,如上图,我们假设内角为90度那么浅灰色区域的扇形角度为90度,外角代表的是深灰色区域和浅灰色区域的角度之和,也即黑色区域的角度为360度-音锥内角角度。
音锥外部增益默认为0,当然你可以进行设置,假如你设置了非零值,那么在黑色区域的音频增益gain为outer_gain * gain,浅灰色区域为你之前普通的增益gain,深灰色区域为两者的线性插值。
那么,全向声源也相当于有向声源的特殊形式。
回到怎么编码的问题上,首先我们看看OpenAL中的声源也就是代码中的alSource,在OpenAL中将声音数据存储到了Source结构中,每一个Source也即一个空间中的有向或全向声源,为了便于控制,我们可以学习PSS中的SourceBuffer构建一个类似的Buffer类(详见其中注释):
public class SoundBuffer {

    //不同于PSS中使用的byte[]数组,我们直接将输入的数据处理成了OpenAL中的alBuffer
    private final int bufferId;
    private final AudioFormat audioFormat;
    private boolean isStream;

    public SoundBuffer(Buffer buffer, AudioFormat audioFormat) {
        //向OpenAL请求一个Buffer并保存该Buffer的索引为bufferId
        this.bufferId = AL10.alGenBuffers();
        //这里我们统一使用ByteBuffer来处理
        ByteBuffer byteBuffer = (ByteBuffer)buffer;
        //存储该段音频的格式
        this.audioFormat = audioFormat;
        //转换为OpenAL中固定的PCM格式
        int format = SoundUtils.getOpenALFormat(audioFormat);
        //对索引bufferId所在的内存写入数据
        alBufferData(bufferId, format,byteBuffer, (int) audioFormat.getSampleRate());
        //记录为非流式数据
        isStream = false;
    }

    public SoundBuffer(AudioFormat audioFormat) {
        //申请一个Buffer索引为之后写入数据做准备
        this.bufferId = AL10.alGenBuffers();
        this.audioFormat = audioFormat;

        isStream = true;
    }

    public int getBufferId() {
        return this.bufferId;
    }

    public void cleanup() {
        //删除OpenAL中指定索引处的内存
        alDeleteBuffers(this.bufferId);
    }

    public boolean isStream() {
        return isStream;
    }
}
这里为什么没有直接读取文件解码保存,因为这里我们选择直接处理裸数据流(对于大部分简单的操作,声音系统已经帮助我们做了妥善的处理,所以这里不再赘述)以下这些数据流都为已经解码了的PCM数据。
接下来构建声源类:
public class SoundSource {

    private final int sourceId;
    private int gain;
    private int sourceVolume;

    public SoundSource(boolean loop, boolean relative) {
        this.sourceId = alGenSources();
        if (loop) {
            alSourcei(sourceId, AL_LOOPING, AL_TRUE);
        }
        if (relative) {
            alSourcei(sourceId, AL_SOURCE_RELATIVE, AL_TRUE);
        }
    }

    public void setBuffer(int bufferId) {
        alSourcei(sourceId, AL_BUFFER, bufferId);
    }

    public void setPosition(Vector3f position) {
        alSource3f(sourceId, AL_POSITION, position.x, position.y, position.z);
    }

    public void setSpeed(Vector3f speed) {
        alSource3f(sourceId, AL_VELOCITY, speed.x, speed.y, speed.z);
    }

    public void setGain(float gain) {
        alSourcef(sourceId, AL_GAIN, gain);
    }

    public float getMaxGain(){
       return AL10.alGetSourcef(sourceId, AL10.AL_MAX_GAIN);
    }

    public void play() {
        alSourcePlay(sourceId);
    }

    public boolean isPlaying() {
        return alGetSourcei(sourceId, AL_SOURCE_STATE) == AL_PLAYING;
    }

    public void pause() {
        alSourcePause(sourceId);
    }

    public void stop() {
        alSourceStop(sourceId);
    }

    public void cleanup() {
        try
        {
            AL10.alSourceStop(sourceId);
            AL10.alGetError();
        }
        catch( Exception e )
        {}
        try
        {
            // Delete the source:
            AL10.alDeleteSources(sourceId);
            AL10.alGetError();
        }
        catch( Exception e )
        {}
    }

    public int getSourceId() {
        return sourceId;
    }
}
侦听者类:
public class SoundListener {

    public SoundListener() {
        this(new Vector3f(0, 0, 0));
    }

    public SoundListener(Vector3f position) {
        //设定位置
        alListener3f(AL_POSITION, position.x, position.y, position.z);
        //设定默认速度
        alListener3f(AL_VELOCITY, 0, 0, 0);
    }

    public void setSpeed(Vector3f speed) {
        alListener3f(AL_VELOCITY, speed.x, speed.y, speed.z);
    }

    public void setPosition(Vector3f position) {
        alListener3f(AL_POSITION, position.x, position.y, position.z);
    }

    //at为你的脸的朝向,up表示你的头顶朝向,一般为(0,1,0)
    public void setOrientation(Vector3f at, Vector3f up) {
        //设定朝向
        float[] data = new float[6];
        data[0] = at.x;
        data[1] = at.y;
        data[2] = at.z;
        data[3] = up.x;
        data[4] = up.y;
        data[5] = up.z;
        FloatBuffer buffer = BufferUtils.createFloatBuffer(data.length).put(data);
        buffer.flip();
        alListener(AL_ORIENTATION, buffer);
    }
}
创建好这3个部分后我们创建管理类:
public class SoundManager {

    private SoundListener listener;

    private final List<SoundBuffer> soundBufferList;

    private final Map<String, SoundSource> soundSourceMap;

    private final Matrix4f cameraMatrix;

    private Logger logger;
    private float millisPreviouslyPlayed = 0;

    public SoundManager() {
        soundBufferList = new ArrayList<>();
        soundSourceMap = new HashMap<>();
        cameraMatrix = new Matrix4f();
        logger = Logger.getLogger(getClass().getSimpleName());
    }

    //添加一个普通的SoundSource
    public void add(String name, Buffer buffer, Vector3f position, AudioFormat af){
        SoundSource soundSource = new SoundSource(false,false);
        soundSource.setPosition(position);
        SoundBuffer soundBuffer = new SoundBuffer(buffer,af);

        soundBufferList.add(soundBuffer);
        soundSource.setBuffer(soundBuffer.getBufferId());
        soundSourceMap.put(name,soundSource);
    }

    //创建一个Stream流数据的SoundSource
    public void addStream(String name, Vector3f position){
        SoundSource soundSource = new SoundSource(false,false);
        soundSource.setPosition(position);
        soundSource.setGain(1f);
        soundSourceMap.put(name,soundSource);
    }

    public SoundSource getSoundSource(String name){
        return soundSourceMap.get(name);
    }

    protected void errorMessage(String message) {
        //todo
    }

    private boolean checkALError() {
        switch(AL10.alGetError()) {
            case 0:
                return false;
            case 40961:
                this.errorMessage("Invalid name parameter.");
                return true;
            case 40962:
                this.errorMessage("Invalid parameter.");
                return true;
            case 40963:
                this.errorMessage("Invalid enumerated parameter value.");
                return true;
            case 40964:
                this.errorMessage("Illegal call.");
                return true;
            case 40965:
                this.errorMessage("Unable to allocate memory.");
                return true;
            default:
                this.errorMessage("An unrecognized error occurred.");
                return true;
        }
    }

    public float millisInBuffer(int alBufferi,AudioFormat format) {
        return (float)AL10.alGetBufferi(alBufferi, 8196) / (float)AL10.alGetBufferi(alBufferi, 8195) / ((float)AL10.alGetBufferi(alBufferi, 8194) / 8.0F) / (float)format.getSampleRate() * 1000.0F;
    }

    public float getMillisPreviouslyPlayed() {
        return millisPreviouslyPlayed;
    }

    //检查队列中已经处理的数量
    public int checkProcessed(String name){
        SoundSource soundSource = getSoundSource(name);
        if(soundSource == null) return -1;
        int sourceId = soundSource.getSourceId();
        int processed = AL10.alGetSourcei(sourceId, AL10.AL_BUFFERS_PROCESSED);
        if(!checkALError()){
            return processed;
        }
        return -1;
    }

    //检查队列中的排队数量
    public int checkQueued(String name){
        SoundSource soundSource = getSoundSource(name);
        if(soundSource == null) return -1;
        int sourceId = soundSource.getSourceId();
        int queued = AL10.alGetSourcei(sourceId, AL_BUFFERS_QUEUED);
        if(!checkALError()){
            return queued;
        }
        return -1;
    }

    //喂入裸数据流
    public int feedRawData(String name, byte[] bytes, AudioFormat af) throws InterruptedException {
        SoundSource soundSource = getSoundSource(name);
        if(soundSource == null) return -1;
        int sourceId = soundSource.getSourceId();
        //请求native buffer,这里容易导致内存溢出,暂时没有解决办法
        ByteBuffer byteBuffer = ByteBuffer.allocateDirect(bytes.length);
        byteBuffer.put(bytes);
        byteBuffer.flip();
        //获取在队列中已经处理的buffers数量
        int processed = AL10.alGetSourcei(sourceId, AL10.AL_BUFFERS_PROCESSED);
        IntBuffer intBuffer;
        if (processed > 0) {
            intBuffer = BufferUtils.createIntBuffer(1);
            AL10.alGenBuffers(intBuffer);

            if (this.checkALError()) {
                return -1;
            }

            AL10.alSourceUnqueueBuffers(sourceId,intBuffer);

            if (this.checkALError()) {
                return - 1;
            }

            if (AL10.alIsBuffer(intBuffer.get(0))) {
                this.millisPreviouslyPlayed += this.millisInBuffer(intBuffer.get(0),af);
            }

            this.checkALError();
        }else {

            intBuffer = BufferUtils.createIntBuffer(1);
            AL10.alGenBuffers(intBuffer);
            if (this.checkALError()) {
                return -1;
            }
        }

        AL10.alBufferData(intBuffer.get(0), SoundUtils.getOpenALFormat(af), byteBuffer,
                (int) af.getSampleRate());

        if (this.checkALError()) {
            return -1;
        } else {
            //将intBuffer丢入OpenAL的队列缓存中
            AL10.alSourceQueueBuffers(sourceId, intBuffer);
            if (this.checkALError()) {
                return -1;
            } else {
                //如果没有播放立即播放
                if (AL10.alGetSourcei(sourceId, AL10.AL_SOURCE_STATE) != AL_PLAYING) {
                    AL10.alSourcePlay(sourceId);
                    this.checkALError();
                }

            }
        }

        return processed;
    }

    public void play(String name){
        SoundSource soundSource = getSoundSource(name);
        if(soundSource != null){
            int sourceId = soundSource.getSourceId();
            if (this.checkALError()) {
            } else {
                if (AL10.alGetSourcei(sourceId, AL10.AL_SOURCE_STATE) != AL_PLAYING) {
                    AL10.alSourcePlay(sourceId);
                    this.checkALError();
                }
            }
        }
    }

    public void stop(String name){
        SoundSource soundSource = getSoundSource(name);
        if(soundSource != null){
            int sourceId = soundSource.getSourceId();
            if (AL10.alGetSourcei(sourceId, AL10.AL_SOURCE_STATE) == AL_PLAYING) {
                this.checkALError();
                AL10.alSourceStop(sourceId);
                this.checkALError();
            }
        }
    }

    //立即从队列中移除已经处理的Buffer
    public void flushProcessed(String name){
        flushIn(name,true);
    }

    //移除所有Buffer不管是否被使用(播放)
    public void flush(String name){
        flushIn(name,false);
    }

    public void flushIn(String name,boolean checkProcessed){
        SoundSource soundSource = getSoundSource(name);
        if(soundSource == null) return;
        int sourceId = soundSource.getSourceId();
        int queued = AL10.alGetSourcei(sourceId, AL_BUFFERS_QUEUED);
        int processed = AL10.alGetSourcei(sourceId,AL_BUFFERS_PROCESSED);
        if (!this.checkALError()) {
            for(; queued > 0; --queued) {
                if(checkProcessed) {
                    if (processed-- <= 0) return;
                }
                try
                {
                    AL10.alSourceUnqueueBuffers(sourceId);
                }
                catch( Exception e )
                {
                    return;
                }
                if(checkALError())
                    return;
            }
            this.millisPreviouslyPlayed = 0.0F;
        }
    }

    public void cleanup(){

        for (SoundSource soundSource :
                soundSourceMap.values()) {
            soundSource.cleanup();
        }

        for (SoundBuffer soundBuffer:
             soundBufferList) {
            soundBuffer.cleanup();
        }

        soundSourceMap.clear();
        soundBufferList.clear();
    }

    public SoundListener getListener() {
        return listener;
    }

    public void setListener(SoundListener listener) {
        this.listener = listener;
    }

    public Matrix4f getCameraMatrix() {
        return cameraMatrix;
    }
}
通过这几个类,我们可以轻松地创建资源播放裸数据流。
我的视频播放器源码地音频线程代码片段:
@Override
public void handle(Frame frame) throws InterruptedException {
    //frame为音频帧包含了已经解码地PCM数据
    sampleRate = frame.sampleRate;
    audioChannels = frame.audioChannels;

    //重新抽取不同格式的音频数据编排为OpenAL接受的格式同时存储为byte数组(这里为单通道)
    byte[] mono = SoundUtils.getAudio(frame.samples,1f,sampleFormat);
    //根据采样格式和采样率已经音频通道数获得音频格式
    AudioFormat format = SoundUtils.getAudioFormat(sampleFormat,sampleRate, audioChannels,sampleRate);

    //+1 is unneccessary, but is not wrong! when a piece of sound is playing, the hardware may play the Nth byte
    //in the array,so the operation of +1 is just believe the sound played by your machine will take more time than
    //the calculated result.
    //more queued bytes mean greater delay of time.
    int queued = soundManager.checkQueued(name) + 1;

    //because of the cache of OpenAL Queue, current byte array that is playing by sound card is not this
    //frame's sound bytes,we need to calculate the "offset"(the delay of video to aligned with sound)
    //[mono.length / sampleRate] means the time of duration of a piece of the sound(one sound byte array -> mono[])
    simplePlayer.getSyncInfo().offset = - (long) (queued * mono.length / sampleRate) * 1000;
    //clear processed arrays to make room for the next sound pieces
    soundManager.flushProcessed(name);

    //discard this frame if the queue of sound array is too long
    if(queued > OpenAlQueueMaxSize) return;
    //input new sound bytes
    soundManager.feedRawData(name,mono,format);

    lastTime = System.currentTimeMillis();
}
音频格式补充
OpenAL只接受非平面型的单声道或立体声格式,因为解码的结果不同,我们这里不考虑超过2通道的其他声音存储格式,如果需要的话可以通过一些手段进行转换这部分内容可以参考FFmpeg对音频的处理方法mutilchannel。
关于channel layout(通道布局)在ffmpeg的文档中解释如下:
For planar sample formats, each audio channel is in a separate data plane, and linesize is the buffer size, in bytes, for a single plane. All data planes must be the same size. For packed sample formats, only the first data plane is used, and samples for each channel are interleaved. In this case, linesize is the buffer size, in bytes, for the 1 plane.
简单来说,布局可以理解为音频字节在buffer数组中的存储格式,对于立体声平面型(stereo planar)音频数据,他的左右声道在数组中的存储是铺展开的:
c1 c2 c1 c2 c1 c2 c1 c2
c1和c2代表左右声道byte数据。
在非平面型中存储是这样的:
c1 c1 c1 c1 … c2 c2 c2 c2 …
而且对于某些音频处理库来说,非平面型数据一般会存储在两个Buffer中,整个数据会以Buffer[N]这样的数组存储(N为常数)。对于平面型,则直接存在Buffer[N]数组的一个Buffer中。
所以当你输入给OpenAL的数据格式是平面型,你需要首先将其转为非平面型数据,也就是对其重新排序:
//以FFmpeg的FMT_S16P为例其代表的是存储格式为 Short类型的双通道16bit平面型
//我们需要将其左右声道的buffer以交错形式存储到同一个buffer中
case avutil.AV_SAMPLE_FMT_S16P:
    leftData = (ShortBuffer)buf[0];
    rightData = (ShortBuffer)buf[1];
    leftByteData = shortToByteValue(ILData,vol);
    rightByteData = shortToByteValue(IRData,vol);
    tl = leftByteData.array();
    tr = rightByteData.array();
    combineArray = new byte[tl.length+tr.length];
    k = 0;
    for(int i=0;i<tl.length;i=i+2) {
        for (int j = 0; j < 2; j++) {
            combineArray[j + 4*k] = tl[i + j];
            combineArray[j + 2 + 4*k] = tr[i + j];
        }
        k++;
    }
    return combine;
最后一点是关于OpenAL Audio Format的转换:
//AudioFormat 是JDK中的一个存储声音格式的类,我们通过以下这个函数来转换为OpenAL的对应格式
public static int getOpenALFormat(AudioFormat format){
    int openALFormat = -1;
    switch(format.getChannels()) {
        case 1:
            switch(format.getSampleSizeInBits()) {
                case 8:
                    openALFormat = AL10.AL_FORMAT_MONO8;
                    break;
                case 16:
                    openALFormat = AL10.AL_FORMAT_MONO16;
                    break;
            }
            break;
        case 2:
            switch(format.getSampleSizeInBits()) {
                case 8:
                    openALFormat = AL10.AL_FORMAT_STEREO8;
                    break;
                case 16:
                    openALFormat = AL10.AL_FORMAT_STEREO16;
                    break;
            }
            break;
    }
    return openALFormat;
}
OpenAL 3D音效
如果要让OpenAL产生具有空间的音效,最后我们还需要将输入给OpenAL的最终音频格式设置为单通道(Mono),如果以立体声形式,OpenAL是无法做空间音效的模拟的。
Minecraft声音系统
1.12.2
最后介绍完PSS和OpenAL后,我们总算要回到Minecraft中了,在Minecraft中,使用的是包装后的PSS,当然也削减了一部分接口,在游戏中我们要播放音频只能通过文件或者网络数据流的方式来播放音频,具体到音频系统的代码上:
public void setVolume(SoundCategory, float)
public boolean isSoundPlaying(ISound)
public void stopSound(ISound)
public void playSound(ISound)
public void pauseAllSounds()
在其播放函数中只能通过文件或者网络资源播放流数据:
sndSystem.newStreamingSource(...);//省略参数
采用单纯的Minecraft声音系统,在大部分情况下都能解决实际需求,但是无法控制播放的持续时间,或者对裸数据流进行播放和处理。所以也无法对播放的时间点进行控制无法快进和后退,对于重量级音视频应用有巨大的使用阻碍。
通过OpenAL,我们完全可以自己处理音频数据,首先我们可以直接使用PSS中的feedRawData函数来喂入我们的数据流,或者直接自己处理我们获取的PCM数据。
一些问题:
1.在PSS中提供的feedRawData函数对数据流简单的处理和真实的音频数据流的时间对齐,造成音频卡顿,产生爆破音。
2.OpenAL的真实增益,在实际测试中,AL_GAIN的属性在文档中的标注是在区间0~1之间,但是经过多次测试,在我的电脑上增益超过1还是能产生一定效果。
待补充~~
引用列表
[1] 维基百科
[2] https://hackage.haskell.org/package/OpenAL-1.7.0.5/docs/Sound-OpenAL-AL-Attenuation.html#g:2